SSIS provides two primary mechanisms for adding custom code to SSIS packages:
- You can use the Script Task (for control flow) or the Script Component (for data flow) to add .NET code directly to your package.
- You can develop your own .NET assemblies that use the SSIS .NET API to interact with the SSIS runtime to create custom tasks, transformations and more.
From my experience, the vast majority of SSIS developers tend to go with option #1. The Script Task and Script Component are relatively simple to implement, and you can take advantage of the .NET Framework base classes from your VB.NET code (or C# code starting with SQL Server 2008) without needing to worry about building and deploying a separate DLL to accompany your packages. Since the code is contained within the package itself, all you need to deploy is the package.
But therein lies the biggest drawback of using the Script Task and Script Component as well: the code is contained within the package itself. This means that if you have the same logic that needs to exist in multiple packages, then you need to copy it into each of them, which can quickly make for a maintenance nightmare if that shared logic needs to be updated.
And this is where custom components come in. Because they are defined outside the package their logic can be defined (and updated) in a single shared location and used in as many packages as necessary. Even though building a custom SSIS component is "real .NET development" it is relatively straightforward if you have .NET development experience. The SSIS object model defines a set of base classes and interfaces, and there samples included with SQL Server so it's easy to cheat during development.
But deployment and testing is often a different story. There are a few minor "gotchas" waiting in store for SSIS component developers:
- In order for SSIS to be able to use a custom assembly it needs to be added to the Global Assembly Cache - the GAC.
- In order for package developers to be able to use a custom assembly in Visual Studio, the assembly needs to be copied to a "special folder" in the SQL Server install directory tree.
- Because the assembly is a DLL, it cannot be run on its own for testing; it needs to be run in the context of another process, and because the assembly is an SSIS component that process really needs to be a running SSIS package.
Now if you're a developer who has experience building other types of .NET applications but have not build components to plug into other products (like BizTalk, Commerce Server - you name it) this may seem daunting. But fortunately this isn't the case - it's really as simple as pie.
First - the GAC. There is a command line utility called GACUTIL.EXE that is included with the Visual Studio SDK and the Windows SDK. On a computer with a standard installation of these two tools, you will find it in these two folders:
- C:\Program Files\Microsoft Visual Studio 8\SDK\v2.0\Bin
- C:\Program Files\Microsoft SDKs\Windows\v6.0\Bin
Warning: Be certain not to use the version of GACUTIL that you may find in the C:\WINDOWS\Microsoft.NET\Framework\v1.1.4322 folder, as this is for the .NET 1.1 version of GACUTIL and SSIS requires .NET 2.0.
Second - the "special folder." The actual folder will vary based on the type of component you're building, but they're all (on a computer with a standard install of SQL Server) subfolders of C:\Program Files\Microsoft SQL Server\90\DTS:
- \Connections
- \ForEachEnumerators
- \LogProviders
- \PipelineComponents
- \Tasks
As you can see, there's a folder for each type of component that you can develop.
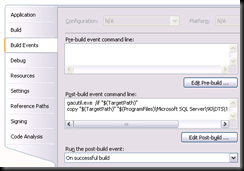
Now that we know where the assembly needs to go, how do we get it there without needing to manually copy it each time you build the project? The answer lies in the project properties, on the Build Events tab:
In the Post-build event command line text box, enter the following text:
gacutil.exe /if "$(TargetPath)"
copy "$(TargetPath)" "$(ProgramFiles)\Microsoft SQL Server\90\DTS\Tasks\$(TargetFileName)" /y
Please note that this example applies to a custom task - if you're building a different type of component, you'll need to put in a different folder path. Also please note that the example above does not include the fully qualified path for GACUTIL.EXE. This is because on my development machines I have added the C:\Program Files\Microsoft Visual Studio 8\SDK\v2.0\Bin folder to the PATH environment variable so I don't need to type in the full path for the many helpful utilities in this folder. If you have not added this folder to your PATH, you will need to fully qualify this file.\
With those disclaimers out of the way, note what this Post-build event does: every time the project is successfully compiled, the project output (the custom task assembly in this case) will automatically be added to the GAC and be copied into the "special folder" where the SSIS designers in Visual Studio need it to be. We're good, right?
Right?
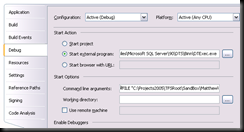
Well, there is still the question of testing and debugging. I'm sure that most developers always write perfect code the first time, but I always seem to need to iterate a few times to get my code just right. And in order to see the runtime behavior of an SSIS component is to add it to a package, and to run that package. Well, that's straightforward enough, but how to do that and still be able to set breakpoints in the component code so we can find those pesky bugs? Fortunately, the answer here is just as simple as before, and the place you enable debugging it in the project properties again - this time on the Debug tab:
There are two things you need to do here:
- Check the "Start external program" and enter the fully qualified path to DTEXEC.EXE in the text box
- Enter the appropriate arguments in the Command line arguments text box, to reference a package that uses the component you want to debug.
Then, it's as simple as debugging any .NET code: set breakpoints where you want to pause execution, and hit F5. Visual Studio will launch DTEXEC.EXE and attach to the new DTEXEC process. DTEXEC will load the package, which will in turn load and call into your custom component. Your breakpoints will be hit and you'll be able to step through your code to your heart's content.
See - as simple as pie.
Update - 01 June 2008: If you're developing your custom component on a 64-bit Windows computer, remember that the folder to which you need to copy your assembly is in the C:\Program Files (x86)\Microsoft SQL Server\90\DTS\ folder, because Visual Studio is a 32-bit application.


4 comments:
There is another version GACUTIL that I fond in 64 bit machine at C:\Program Files\Microsoft.NET\SDK\v2.0 64 bit\bin. Should we use this 64 bit version of GACUTIL.EXE for 64 bit SQL Server 2005 and Windows Server?
Thanks,
Charley
I created a custom SSIS component and when I tried to use multiple instances of my component in a single package. It behaves wierdly. Both the tasks marked finished same time though any one of the tasks is still working.
Any clue?
Thanks,
@Shripad - I've never seen this behavior, so I don't want to guess at a possible reason. Your best bet is probably to post your problem on the MSDN SSIS forums here: http://social.msdn.microsoft.com/Forums/en-US/sqlintegrationservices/threads.
Good luck!
Hi there,
Just wanted to say that the article update of 01 June 2008 about copying the Task to C:\Program Files (x86)\ and nont to C:\Program Files\ saved me a HUGE amount of time.
Thank you sir !
Post a Comment